Pages

Subscribe: RSS twitter facebook

How to Blog | How to Add Top 10 Box Office Movies by Fandango

01. Go to http://www.gmodules.com/ig/creator?url=http://totalgta.net/igoogle/quotes/islam/sidequote3.xml
02. On the title text box give your desire title.
03. Fix width a height.
04. Select a border.
05. Set the gadget setting.
06. Click on 'Get the Code'.
07. Copy the code given by them.
08. Lo in to your 'Dashboard'.
09. Go to 'Design'.
10. Click on 'Add a Gadget' on your desire place of your sit template.
11. Choose 'HTML/JavaScript'.
12. Paste he coped code on the box.
13. Click on save and you are done.

How to Blog | How to Add Daily Horoscope and Zodiac on Blog

01. Go to http://www.gmodules.com/ig/creator?url=http://totalgta.net/igoogle/tools/horoscope/gadget6.xml
02. On the title text box give your desire title.
03. Fix width a height.
04. Select a border.
05. Click on 'Get the Code'.
06. Copy the code given by them.
07. Lo in to your 'Dashboard'.
08. Go to 'Design'.
09. Click on 'Add a Gadget' on your desire place of your sit template.
10. Choose 'HTML/JavaScript'.
11. Paste he coped code on the box.
12. Click on save and you are done.

How to Blog | How to Add Check Stock Prices Widget

01. Go to http://www.gmodules.com/ig/creator?url=http://totalgta.net/igoogle/tools/stocks/gadget6.xml
02. On the title text box give your desire title.
03. Fix width a height.
04. Select a border.
05. Click on 'Get the Code'.
Add Check Stock Prices Widget
06. Copy the code given by them.
07. Lo in to your 'Dashboard'.
08. Go to 'Design'.
09. Click on 'Add a Gadget' on your desire place of your sit template.
10. Choose 'HTML/JavaScript'.
11. Paste he coped code on the box.
12. Click on save and you are done.

How to Blog | How to Add Islam Quotes Of The Day

01. Go to http://www.gmodules.com/ig/creator?url=http://totalgta.net/igoogle/quotes/islam/sidequote3.xml
02. On the title text box give your desire title.
03. Fix width a height.
04. Select a border.
05. Click on 'Get the Code'.
Add Islam Quotes Of the day
06. Copy the code given by them.
07. Lo in to your 'Dashboard'.
08. Go to 'Design'.
09. Click on 'Add a Gadget' on your desire place of your sit template.
10. Choose 'HTML/JavaScript'.
11. Paste he coped code on the box.
12. Click on save and you are done.

How to Blog | How to Add a Youtube Search on blogger

01. Go to http://www.gmodules.com/ig/creator?url=http://totalgta.net/igoogle/tools/search/youtube/test1.xml.
02. On the title text box give your desire title.
03. Fix width a height.
04. Select a border.
05. Select site language.
06. Click on 'Get the Code'.
Add YouTube Search
07. Copy the code given by them.
08. Lo in to your 'Dashboard'.
09. Go to 'Design'.
10. Click on 'Add a Gadget' on your desire place of your sit template.
11. Choose 'HTML/JavaScript'.
12. Paste he coped code on the box.
13. Click on save and you are done.

How to Blog | How to Add a PaayPal Donate Button on your blogger

1. Log in to your 'Dashboard'.
2. Go to http://www.gmodules.com/ig/creator?url=http://totalgta.net/igoogle/tools/donate/donate.xml with a new tab in your browser.
3. Set your desire title on he title text box.
4. Fix width and height.
5. Select a border.
6. Give your email address with which you make your PayPal account on the 'PayPal Email Address' text box.
7. Set currency and credit card option.
8. Click on 'Get the Code'.
09. Copy the code given by them on the below.
Add Donate button on blogger
10. Go to your 'Dashboard' and click on 'Design'.
11. Click on 'Add a Gadget' on your desire place in your template.
12. Choose 'HTML/JavaScript' as input type.
13. Paste the coped code.
14. Click on save and your are done.

How to Blog | How to Add The Pop Up Subscription Box To Blogger

01. Lo in to your blogger 'Dashboard'.
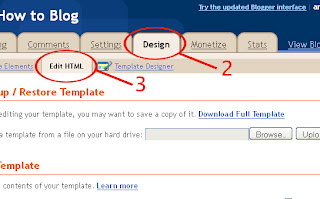
02. Click on 'Design'.
03. Click on 'Edit HTML'.
Adding pop up Subscription box
04. Check the 'Expand Widget content'.
05. Find this : ]]></b:skin>
06. Copy and paste following code before ]]></b:skin>
/*Subscription Pop Up Css*/
#popupContactClose{
cursor: pointer;
text-decoration:none;
}
#backgroundPopup{
display:none;
position:fixed;
_position:absolute; /* hack for internet explorer 6*/
height:100%;
width:100%;
top:0;
left:0;
background:#000000;
border:1px solid #cecece;
z-index:1;
}
#popupContact{
display:none;
position:fixed;
_position:absolute; /* hack for internet explorer 6*/
height:384px;
width:408px;
background:#FFFFFF;
border:2px solid #cecece;
z-index:2;
padding:12px;
font-size:13px;
}
#popupContact h1{
text-align:left;
color:#6FA5FD;
font-size:22px;
font-weight:700;
border-bottom:1px dotted #D3D3D3;
padding-bottom:2px;
margin-bottom:20px;
}
#popupContactClose{
font-size:14px;
line-height:14px;
right:6px;
top:4px;
position:absolute;
color:#6fa5fd;
font-weight:700;
display:block;
}
/*End Subscription Pop Up Css @ http://www.spiceupyourblog.com */
07. Find it: </head>
08. Copy and paste the following code before </head>


<!--Pop Up Subscription-->
<script src='https://ajax.googleapis.com/ajax/libs/jquery/1.5.0/jquery.min.js' type='text/javascript'/>
<script src='http://dinhquanghuy.110mb.com/jquery.cookie.js' type='text/javascript'/>
<script type='text/javascript'>
var popupStatus = 0;

//loading popup with jQuery magic!
function loadPopup(){
centerPopup();
//loads popup only if it is disabled
if(popupStatus==0){
$(&quot;#backgroundPopup&quot;).css({
&quot;opacity&quot;: &quot;0.7&quot;
});
$(&quot;#backgroundPopup&quot;).fadeIn(&quot;slow&quot;);
$(&quot;#popupContact&quot;).fadeIn(&quot;slow&quot;);
popupStatus = 1;
}
}

//disabling popup with jQuery magic!
function disablePopup(){
//disables popup only if it is enabled
if(popupStatus==1){
$(&quot;#backgroundPopup&quot;).fadeOut(&quot;slow&quot;);
$(&quot;#popupContact&quot;).fadeOut(&quot;slow&quot;);
popupStatus = 0;
}
}

//centering popup
function centerPopup(){
//request data for centering
var windowWidth = document.documentElement.clientWidth;
var windowHeight = document.documentElement.clientHeight;
var windowscrolltop = document.documentElement.scrollTop;
var windowscrollleft = document.documentElement.scrollLeft;
var popupHeight = $(&quot;#popupContact&quot;).height();
var popupWidth = $(&quot;#popupContact&quot;).width();
var toppos = windowHeight/2-popupHeight/2+windowscrolltop;
var leftpos = windowWidth/2-popupWidth/2+windowscrollleft;
//centering
$(&quot;#popupContact&quot;).css({
&quot;position&quot;: &quot;absolute&quot;,
&quot;top&quot;: toppos,
&quot;left&quot;: leftpos
});
//only need force for IE6

$(&quot;#backgroundPopup&quot;).css({
&quot;height&quot;: windowHeight
});

}


//CONTROLLING EVENTS IN jQuery
$(document).ready(function(){
if ($.cookie(&quot;anewsletter&quot;) != 1) {

//load popup
setTimeout(&quot;loadPopup()&quot;,5000);
}
//CLOSING POPUP
//Click the x event!
$(&quot;#popupContactClose&quot;).click(function(){
disablePopup();
$.cookie(&quot;anewsletter&quot;, &quot;1&quot;, { expires: 7 });
});
//Click out event!
$(&quot;#backgroundPopup&quot;).click(function(){
disablePopup();
$.cookie(&quot;anewsletter&quot;, &quot;1&quot;, { expires: 7 });
});
//Press Escape event!
$(document).keypress(function(e){
if(e.keyCode==27 &amp;&amp; popupStatus==1){
disablePopup();
$.cookie(&quot;anewsletter&quot;, &quot;1&quot;, { expires: 7 });
}
});

});
</script>
<!--End Pop Up Subscription @ http://www.spiceupyourblog.com -->
09. Find for: </body>
10. Copy and paste the following code before </body>

<div id='popupContact'>
<a id='popupContactClose'>x</a>
<h1>Get Our Latest Posts Via Email - It&#39;s Free</h1>
<p id='contactArea'><form action='http://feedburner.google.com/fb/a/mailverify' method='post' onsubmit='window.open(&apos;http://feedburner.google.com/fb/a/mailverify?uri=SpiceUpYourBlog&apos;, &apos;popupwindow&apos;, &apos;scrollbars=yes,width=550,height=520&apos;);return true' style='border:1px solid #ccc;padding:3px;text-align:center;' target='popupwindow'><p>Enter your email address:</p><p><input name='email' style='width:140px' type='text'/></p><input name='uri' type='hidden' value='SpiceUpYourBlog'/><input name='loc' type='hidden' value='en_US'/><input type='submit' value='Subscribe'/><p>Delivered by <a href='http://feedburner.google.com' target='_blank'>FeedBurner</a></p></form></p>
</div>
<div id='backgroundPopup'/>
11. Save the template and you are done.

How to Blog | Add Stylish New Social Icons On Your Blog

01. Log in to your 'Dashboard'.
02. Click on 'Design' tab.
Click on Design
03. Click on the 'Add a Gadget' where you want to add this button.
Click on Add a Gadget
04. Choose HTML/JavaScript from the coming window.
05. Copy and Paste the following code to there.
<a href="http://facebook.com/spiceupyourblog" imageanchor="1" style="margin-left: 1em; margin-right: 1em;"><img border="0" src="https://blogger.googleusercontent.com/img/b/R29vZ2xl/AVvXsEjQ14ZIwdGhvRjhG5-NvKUZeKHDNuMHwfRJq7sddRI_7DD72NA_KOXdGf7PsXcayx5UqAl5oiYmqnSjqGqKBQgOwxDlKYs0X271ct3BhPTToPIxXKX28LIEv0lRf2NC4pWimbTXkQr1e5I/s1600/facebook-30x43.png" /></a><a href="http://twitter.com/paulcrowepro" imageanchor="1" style="margin-left: 1em; margin-right: 1em;"><img border="0" src="https://blogger.googleusercontent.com/img/b/R29vZ2xl/AVvXsEi9LC97gQpCDSsKE-dkYAL-OANlMqvSGLoI-wSSCe1wKKUZHOLa4N9FixZ7LllLsd4lWLbIPwW1aYeIxRXX3RoUMgDrwAzlmCMzxREdl8i685q754vMsr15TGGLvLFnJRL5zoeSblt5PVU/s1600/twitter-30x43.png" /></a><a href="https://plus.google.com/u/0/117023786342362231815/" imageanchor="1" style="margin-left: 1em; margin-right: 1em;"><img border="0" src="https://blogger.googleusercontent.com/img/b/R29vZ2xl/AVvXsEhGF5VdpmHG9jmPT53I3qFCkglRO9jw_RkrZF8avfh2ciL_X3FcEGwZmFkwDYKB7nxoON7vUu5FQFDQ11xtAcmnL1DRx4UilWAIy2MfCHI9jJpIHNmYksDURcrKjmx08R5xtpuxYRC_9wo/s1600/googleplus-30x43.png" /></a><a href="http://feeds.feedburner.com/spiceupyourblog" imageanchor="1" style="margin-left: 1em; margin-right: 1em;"><img border="0" src="https://blogger.googleusercontent.com/img/b/R29vZ2xl/AVvXsEiREL0srE8zLyud-w2sLKRqgsIrm-XH_pRtiySFowWqqzOUBmeF575_e1VZ-QfBNPjmZlwAN84_2thLPzP1wynjDjPtKy4dnMTQhY349uJiPmkaRbsHgH1TRm1royAnAlg-Jej-OscwdMM/s1600/rss-30x43.png" /></a>
07. Click on 'Save'.
08. You are now done. 

How to Blog | How to Add The Fixed Navigation Menu To Blogger


01. Log in to your blogger 'Dashboard'.
Click on Design
02. Click on the tab 'Design'.
03. Click on the 'Template Designer'.
Click on Template Designer
04. Click on 'Advance'.
05. Click on 'Add CSS' on the end.
Click on Advance and Click on Add CSS
06. Copy and Paste the below script onto the CSS section:


/* CSS Style for Horizontal Menu - info @ http://www.spiceupyourblog.com*/
#hor {
list-style:none;
padding:0;
margin:0;
}

#hor li {
float:left;
padding:5px;
}

#hor a {
display:block;
height: 12px;
text-indent:-999em;
}

#hor a.home {
width:46px;
background:url(vHome.gif) no-repeat 0 0;
}

#hor a.download {
width:94px;
background:url(vDownload.gif) no-repeat 0 0;
}

#hor a.contact {
width:74px;
background:url(vContact.gif) no-repeat 0 0;
}


/* CSS Style for Vertical Menu */

#ver {
list-style:none;
padding:0;
margin:0;
}

#ver li {
padding:2px;
}

#ver li a {
display:block;
height:12px;
text-indent:-999em;
}

#ver a.home {
width:47px;
background:url(hHome.gif) no-repeat 0 0;
}

#ver a.download {
width:95px;
background:url(hDownload.gif) no-repeat 0 0;
}

#ver a.contact {
width:74px;
background:url(hContact.gif) no-repeat 0 0;
}


.clear {
clear:both;
}


*{
/* A universal CSS reset */
margin:0;
padding:0;
}


#navigationMenu body{
font-size:14px;
color:#666;
background:#111 no-repeat;


/* CSS3 Radial Gradients */
background-image:-moz-radial-gradient(center -100px 45deg, circle farthest-corner, #444 150px, #111 300px);
background-image:-webkit-gradient(radial, 50% 0, 150, 50% 0, 300, from(#444), to(#111));

font-family:Arial, Helvetica, sans-serif;
}

#navigationMenu li{
list-style:none;
height:39px;
padding:2px;
width:40px;
}

#navigationMenu span{
/* Container properties */
width:0;
left:38px;
padding:0;
position:absolute;
overflow:hidden;

/* Text properties */
font-family:'Myriad Pro',Arial, Helvetica, sans-serif;
font-size:18px;
font-weight:bold;
letter-spacing:0.6px;
white-space:nowrap;
line-height:39px;

/* CSS3 Transition: */
-webkit-transition: 0.25s;

/* Future proofing (these do not work yet): */
-moz-transition: 0.25s;
transition: 0.25s;
}

#navigationMenu a{
background:url('https://blogger.googleusercontent.com/img/b/R29vZ2xl/AVvXsEhEmmJPZv9djHDdfU3PAZb9NSMYrcRjZRrv1psy2aEDbLDJrhnmsiYJsxoFGv_CrX6fPR0KoRyQweCEhujUPm-F8-usDkXUTbyC6gG8opwkBVVGcjF56jBJKAEvwK8fSL_MxAHiqlW7GUo/s1600/navigation.jpg') no-repeat;

height:39px;
width:38px;
display:block;
position:relative;
}

/* General hover styles */

#navigationMenu a:hover span{ width:auto; padding:0 20px;overflow:visible; }
#navigationMenu a:hover{
text-decoration:none;

/* CSS outer glow with the box-shadow property */
-moz-box-shadow:0 0 5px #9ddff5;
-webkit-box-shadow:0 0 5px #9ddff5;
box-shadow:0 0 5px #9ddff5;
}

/* Green Button */

#navigationMenu .home { background-position:0 0;}
#navigationMenu .home:hover { background-position:0 -39px;}
#navigationMenu .home span{
background-color:#7da315;
color:#3d4f0c;
text-shadow:1px 1px 0 #99bf31;
}

/* Blue Button */

#navigationMenu .about { background-position:-38px 0;}
#navigationMenu .about:hover { background-position:-38px -39px;}
#navigationMenu .about span{
background-color:#1e8bb4;
color:#223a44;
text-shadow:1px 1px 0 #44a8d0;
}

/* Orange Button */

#navigationMenu .services { background-position:-76px 0;}
#navigationMenu .services:hover { background-position:-76px -39px;}
#navigationMenu .services span{
background-color:#c86c1f;
color:#5a3517;
text-shadow:1px 1px 0 #d28344;
}

/* Yellow Button */

#navigationMenu .portfolio { background-position:-114px 0;}
#navigationMenu .portfolio:hover{ background-position:-114px -39px;}
#navigationMenu .portfolio span{
background-color:#d0a525;
color:#604e18;
text-shadow:1px 1px 0 #d8b54b;
}

/* Purple Button */

#navigationMenu .contact { background-position:-152px 0;}
#navigationMenu .contact:hover { background-position:-152px -39px;}
#navigationMenu .contact span{
background-color:#af1e83;
color:#460f35;
text-shadow:1px 1px 0 #d244a6;
}

/*End menu css - info @ http://www.spiceupyourblog.com */
07. Save your template.
08. Go to 'Design' again.
09. Click on 'Add a Gadget'.
Click on 'Add A Gadget'
10. Click on 'HTML/JavaScript' from the new window.
11. Copy and Paste the following code to the coming box and then save.
       <div style='position: fixed; top: 40%; left: 0%;'/>
<ul id="navigationMenu">
<li>
<a class="Home" href="http://www.spiceupyourblog.com">
<span>Home</span>
</a>
</li>

<li>

<a class="about" href="http://www.spiceupyourblog.com/p/about-spice-up-your-blog.html">
<span>About</span>
</a>
</li>

<li>
<a class="services" href="http://www.spiceupyourblog.com/p/hire-us_08.html">
<span>Services</span>
</a>

</li>

<li>
<a class="portfolio" href="http://www.spiceupyourblog.com/">
<span>Portfolio</span>
</a>
</li>

<li>
<a class="contact" href="http://www.spiceupyourblog.com/2009/09/contact-us.html">

<span>Contact us</span>
</a>
</li>
</ul>
</div><a href="http://www.spiceupyourblog.com/" target="_blank"><small>Get The Fixed Menu Gadget</small></a>

How to Blog | Blogger Template | Green Alien

'How to Blog' do not only give you suggestion for how to blog. This also have some extra featuring Blogger Template and Blogger Gadget. This is a nice template for you. If you install this on your blog you will must thanks 'How to Blog' for this that 'How to Blog' give you a wonderful blogger template.To set up this template on your site
1. Click on the 'Download' button from below.
2. Download zip folder.
3. Extract the folder.
4. Open the folder.
5. Go to your blogger 'Dashboard'.
6. Click on 'Design'.
7. Click on 'Edit HTML'.
8. Then Upload the file named 'Green Alien.xml' from the extracted folder.
Then enjoy and go www.howtoblog24.blogspot.com for other template and information.


How to Blog | How to Add Related Posts Widget to Your Blog.

Related Posts Widget
By this post on how to blog you can learn how to add related posts widget on your blog
1. Sign in to your 'Dashboard'.
2. Go to 'Design'.
3. Go to 'Edit HTML'
4. Check the 'Expand Widget Templates'.
5. Search for the </head> tag.
6. Add the code just before the tag.
<style> #related-posts { float : left; width : 540px; margin-top:20px; margin-left : 5px; margin-bottom:20px; font : 11px Verdana; margin-bottom:10px; } #related-posts .widget { list-style-type : none; margin : 5px 0 5px 0; padding : 0; } #related-posts .widget h2, #related-posts h2 { font-size : 20px; font-weight : normal; margin : 5px 7px 0; padding : 0 0 5px; } #related-posts a { text-decoration : none; } #related-posts a:hover { text-decoration : none; } #related-posts ul { border : medium none; margin : 10px; padding : 0; } #related-posts ul li { display : block; background : url("https://blogger.googleusercontent.com/img/b/R29vZ2xl/AVvXsEiP3PBhTPjO3riRGLIkAiJAWbv3bYR-bpCBpLEGK0pfNGv1oguZTQ2KeI-N0X8spKAX-5l98PD362incFfywaAMirrYF99Hw9ky665x4R4xVoY8oN-iLuxFdCD58cQ9WbfDHSoypNonueA/") no-repeat 0 0; margin : 0; padding-top : 0; padding-right : 0; padding-bottom : 1px; padding-left : 21px; margin-bottom : 5px; line-height : 2em; border-bottom:1px dotted #cccccc; } </style> <script src='http://theblogtemplates.com/scripts/Related_posts_hack.js' type='text/javascript'/>
7. Now search for <data:post.body/>. In some of the templates this code may this
<div class='post-body>
or
<data:post.body/>
8. Add the following code just under the code you just searched for. 
<b:if cond='data:blog.pageType == "item"'>
<div id="related-posts">
<font face='Arial' size='3'><b>Related Posts : </b></font><font color='#FFFFFF'><b:loop values='data:post.labels' var='label'><data:label.name/><b:if cond='data:label.isLast != &quot;true&quot;'>,</b:if><b:if cond='data:blog.pageType == &quot;item&quot;'>
<script expr:src='&quot;/feeds/posts/default/-/&quot; + data:label.name + &quot;?alt=json-in-script&amp;callback=related_results_labels&amp;max-results=5&quot;' type='text/javascript'/></b:if></b:loop> </font>
<script type='text/javascript'> removeRelatedDuplicates(); printRelatedLabels();
</script>
</div></b:if>
9. Now Save your Template and you're done.

How to Blog | How to Add Weather Widget on Blogger.

Weather Widget
On this post of 'How to Blog' We give you the information how to add weather widget on blogger.
If you are a Bangladeshi see the post 'How to Blog |  How to Add Weather Widget on Blogger (Only for BD Website)'.
1. Go to 'http://www.weather.com/services/oap/weather-widgets.html?from=wxtools_WeatherWidget'.
2. Choose your Location from the 'Choose a Location' box.
3. Choose Standard or Metric on the 2nd step.
4. Choose an Orientation from the 3rd step.
5. Choose a theme from the next step.
6. Then click on 'Get the Code' button.
7. Copy the code given.
8. Sign in to your 'Dashboard'.
9. Click on 'Design'.
10. Click on 'Add a Gadget' on your desire sidebar where you want to keep this widget.
11. Click on 'HTML/Javascript'.
12. Paste the coped code from the weather.com.

How to Blog | How to Add Weather Widget on Blogger (Only for BD Website).

Weather Widget
1. Sign in to your website 'Dashboard'.
2. Click on 'Design'.
3. Click on 'Add a Gadget' on the sidebar.
4. Click on 'HTML/JavaScript' from the new window.
5. Copy and paste the below code.
<script type="text/javascript" src="http://voap.weather.com/weather/oap/BGXX0014?template=DRIVH&par=3000000007&unit=1&key=twciweatherwidget"></script>
6. Click on 'Save'.

How to Blog : How to Add Floating Share Button on Blogger

1. Sign in to your blogger 'Dashboard'.
2. Go to 'Design'.
3. Go to 'Edit HTML'.
4. Check 'Expand Widget Templates'.
5. Search for ']]></b:skin>'.
6. Add the below code just above it.


position:fixed;_position:absolute;bottom:0px;left:0px;clip:
inherit;_top:expression(document.documentElement.scrollTop+document.documentElement.clientHeight-this.clientHeight);_left:expression(document.documentElement.scrollLeft + document.documentElement.clientWidth – offsetWidth);}
#float_corner {padding: 5px;
border-bottom: 1px solid #e8e8e8;
7. Save your template.
8. Search for '</body>' code.
9. Add the below code just above it.
<div id=’float_corner’>
<ul>
<script type=’text/javascript’>
(function() {
var s = document.createElement(&#39;SCRIPT&#39;), s1 = document.getElementsByTagName(&#39;SCRIPT&#39;)[0];
s.type = &#39;text/javascript&#39;;
s.async = true;
s.src = &#39;http://widgets.digg.com/buttons.js&#39;;
s1.parentNode.insertBefore(s, s1);
})();
</script><a class=’DiggThisButton DiggMedium’/><br/>
<script src=’http://tweetmeme.com/i/scripts/button.js’ type=’text/javascript’/><br/>
<a class=’google-buzz-button’ data-button-style=’normal-count’ data-locale=’en_IN’ href=’http://www.google.com/buzz/post’ title=’Post on Google Buzz’/>
<script src=’http://www.google.com/buzz/api/button.js’ type=’text/javascript’/><br/>
<script badgetype=’square’ src=’http://d.yimg.com/ds/badge2.js’ type=’text/javascript’>
ARTICLEURL
</script><br/>
<a href=’http://www.facebook.com/sharer.php’ name=’fb_share’ type=’box_count’>Share</a><script src=’http://static.ak.fbcdn.net/connect.php/js/FB.Share’ type=’text/javascript’/><br/>
<a href=’http://templates-widgets.blogspot.com/2011/03/floating-share-button-for-blogger.html>Get This</a><br/>
</ul>
</div>
10. Save your template.
11. Your floating share button is added.

How to Blog : How to Add Twitter Bird on Your Blog

Twitter Bird for Blogger
1. Sign in to your website 'Dashboard'.
2. Click on 'Design'.
3. Click on 'Edit HTML'
4. Find the </body> tag. (For finding this you can press Ctrl+F and then write </body> on find box.
5. Copy and paste the below code before </body> tag.
<script src="http://bloggerblogwidgets.googlecode.com/files/way2blogging.org-tripleflap.js" type="text/javascript">
</script>
<script type="text/javascript">
var twitterAccount = &quot;amannan&quot;;
var tweetThisText = &quot; <data:blog.pageTitle/> : <data:blog.url/> &quot;;
tripleflapInit();
</script>
6. Change 'amannan' with your twitter username.

How to Blog : How to Give a New Post on your Website.

1.   Sign in to your 'Dashboard'.
Click on New Post
2.   Click on the 'New Post' button.
3.   On 'New Post' page give your post title ion the title text box.
4.   Then write down the body text of your post.
Give Post

5.   Give a Category of your post on the 'Labels' box so that visitor can find out his desire posts easily.
6.   Click on the yellow color 'PUBLISH POST' button.
And your new post is published

How to Blog: How to Open a New Website on Blogger: 3rd step

Choose Template

1.      The 3rd step is to choose a template for your new website.
2.      Choose a template as your wish.
3.      You can choose a normal template at this time because you can change this in future very simply.
            4.   Click on ‘CONTINUE’.

How to Blog: How to Open a New Website on Blogger: 2nd step


1.      The name of this step is ‘NAME BLOG’.
2.      On this step you have to give a title and a URL for your website.
3.      Then verify another humanity test. 
4.   Click on ‘CONTINUE’.
NAME BLOG

How to Blog : How to Open a New Website on Blogger : 1st step

            1.      First of all go to www.blogger.com .
2.      Click on ‘Get started’ button.
3.      On the appearing page you should complete your sign up process in three steps.
4.      The first step is ‘CREATE ACCOUNT’.
CREATE ACCOUNT
5.      On this step you should give your email address which you want to use as your website sign up email. This is also the default email of your site.
Give Email
6.      Then you should give a password for your site that will be used to sign in to your site to edit or giving post on your site.
7.      After that you have to give a display name for your site.
Give Password and Display name
8.      Then give your gender and birth date.
9.      At least check the box that is called I accept the Terms of Service.
10.  Give the word verification test that you are a human and click on the ‘CONTINUE’ button
Give Birth date, Gender and Others
.

How to Blog : What You Can Do With Blogger Blog

You can do everything that man do with a website. You can use this as a dairy of you. You can use it for selling a product. You can help people by give any service. You also can make it as a social networking site with your family or friends. Actually it is a domain of your own by which you can do everything such a local domain. Beside this you can earn an extra money by serving Google ad on your site which is called 'Google ad sense'. There are also some other ad company to serve ad on your site and earn money.

How to Blog : What is Blogger.

Blogger is a free system by Google which give you free hosting and domain name for making a individual website. You can totally edit this site for your own use and also can use thousand of free template from internet. And you can edit this template also. Shortly you can do everything by this. You also serve advertise from ad Clint on this site.